Showing posts with label art journaling. Show all posts

Friday, July 30, 2021

Light As A Feather...Journaling with Julie 13

Time again for another installment of Journaling with Julie, in which my sister in Jersey and I in Ohio recreate the art journal projects from the Tamara LaPorte book, Create Your Life Book. This lesson includes thinking of something you've done that you're not thrilled with and then letting it go and forgiving yourself. You write some things on the page, collage and paint and then draw a feather.


I'll share Julie's first, since she finished first. 😅


Julie used homemade ink (rubbing alcohol/food coloring) for the background, collaged some napkins and a teabag for texture. She drew the feather with a Micron pen and used Tombow markers for depth and color to the feather. Then she used a white Posca pen to add dots and details to the feather and added arrow washi tape. Finally, she wrote in some positive phrases such as I am strong, I can do this, and there is a reason and purpose for everything.


For my piece, I used Distress Oxide spray inks in blue and pink, added white acrylic paint marker (cuz I didn't want to drag out the acrylic paints). I used flower and leaf stickers and some butterfly and woodgrain scrapbook papers. I used my white marker for details on the feather and wrote in some words like trust, breathe and love. My washi tapes are some great patterned ones from Dylusions.

Again, I recommend this book if you're looking for some fun projects that also make you think.

Happy Friday!
Chark


Friday, May 7, 2021

Free Your Mind...Journaling with Julie 12

Today I'm posting the next lesson that my sister, in New Jersey, and I, in Ohio, each worked on from the Create Your Life Book art journaling book by Tamara LaPorte. While life took some twisty turns, we took a break from art journaling together/apart, but we're back, baby!

For this lesson, you were to write something in pencil that was bothering you about your art and then you bury it on the hill and move on. Julie chose the belief that her art wasn't good enough and then buried that thought under decoupage, paint and stamping. She used watercolor on her angel/girl face and a micron pen for the outlining. The collage pieces were acrylic, watercolored and alcohol ink painted papers. After that, Julie added scrapbook papers and a little waxed paper for texture.


After adding Tombow markers for the dress and tights, Julie added the Wonder stamp on the dress. Additionally, Julie added more stamping, stenciled the air swirls for movement and used dabs of acrylic paint with her fingers and a cotton swap. She added white acrylic paint to tie it all together and Micron pen doodles finished it up. I think the stamping and the swirls are the perfect touches. And I like the dark paint on the bottom, it really grounds that part and makes the air look lighter.


My girl took a bit of time too, though I did no stamping or stenciling. I wrote my belief to bury—that creating is essential to my well-being but feels more like selfishness—and collaged and painted the heck out of it.


I used pre-printed papers, music sheets and some text paper for mine and then added some gelato crayons over the papers. 


I used white thinned down acrylic paint over all the colors and papers to unify and then used a Pitt Artist Pen big brush marker in yellow for her dress.


After a ton of doodling with white and black pens, I also added the words I Matter to her dress. At first, I outlined the flowers on the hill but then decided it took too much attention from the angel girl, so I repainted them.


Now I can't decide which is better. But once I put a project away, I don't revisit it, so this is how it stays!


Hope you can bury the negative thoughts that get in the way of you making art...'cuz art is important!

Happy Friday!
Chark


Friday, November 6, 2020

Hey, Girl...Journaling with Julie 11

These Hey Girl memes crack me up...even though I know they're not new. I used it for the post title because for this week's installment of our long-distance art journaling, my sister, Julie, and I created Girl Portraits from the Tamara LaPorte book, Create Your Life. 

I've previously taken a Lifebook course with Tamara (online) and learned step-by-step how to create a whimsical girl portrait. In the book, you get the info but it's not nearly as comprehensive or helpful as the video for people like me. However, if you can't take the online course, the book is a fun way to learn how to art journal from a variety of artists. I do recommend it.


I took some photos along the way so you could see. First, of course, is the sketch. The next is water-soluble crayon. I used Gelatos with water and then painted it on like watercolors. This second step is where I panic a little, all the sketching seems lost and she is very flat-looking.


The next step was adding watecolor pencils and adding back in the details lost with the first layer of paint. I'm still not happy with her at this stage, but I forged on. The fourth step was to add in acrylic paints. You'll notice I changed the eye color for no real reason, and I added in pinks and purples in the shadows just like the example. I was a little afraid to use the stark white in the middle of her face, nose and around her lips. But it does add dimension and there's still a lot of painting to do. So I kept going as instructed.


For the 5th step, you add collage papers to the background and then scribble on with your Gelatos again. I used water and my fingers to smooth the crayon out. In the 6th step, you're supposed to brayer on some white gesso, but I didn't have those things handy, so I dry brushed some white acrylic paint to unite the background. Then I added some doodles with watercolor pencil. I'm starting to feel better about her at this step.


The 7th step includes coloring in those doodles and adding some color blocks back into the background. I used black Tombow marker to add lines to the doodles, hair and wing on the left side of the picture. For the final step, more doodles were added with black pen and white gel pen, along with highlights and shadows. I like how she turned out. In the original painting, Tamara has an owl on the girl's shoulder and I had a bird instead...but when I got towards the end, it turned out to be a duck for some reason. I get all my wisdom from rubber duckies apparently.
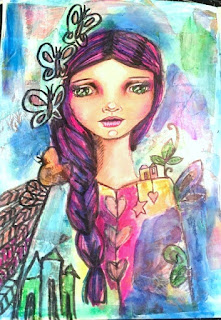
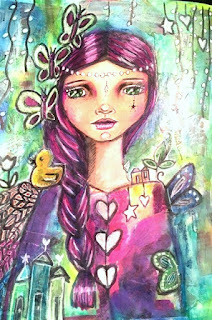
Whew, lots of layers, lots of media and lots of changes as I went through the process. Having taken the online class (versus just using the book) I knew that the painting would look bad at some points and that I had to just keep going. I'll admit I did tear the page some on the cheek (left as you're looking at it here) because I used too much water but I just added some dry Gelato and smoothed it the best I could. Just keep going and be okay with mistakes.

Here's Julie's process for her interpretation of the lesson.

"I outlined her with a ultrafine sharpie and then used watercolor gouache on her hair using my fingers instead of a brush. I put butterflies in her hair to represent the wings. I used different colored inks to stamp the butterflies on and outlined a couple with Posca pens. I also stamped the word fly and went over the word with a white Posca pen and outlined it with a black Posca pen. 

I used watercolor pencils on her skin and even did some shading which was a little scary for me since I’m not used to doing that. I kept adding a layer after one dried until I got the right shading I liked. I also used watercolor pencils on her eyes, lips, eyebrows, and eyelashes. I used watercolor gouache on her shirt as well. I added details to her Yin Yang with my Posca pens. I wasn’t real happy with the background so I painted it with black acrylic paint and then added white Posca pen dots. I’m really happy with the way it turned out."
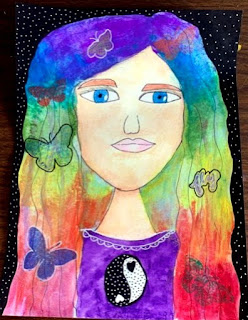

Of course, Julie did more of the thinking part of this art lesson, I tend to skim that part (choosing which symbols you want and what they represent to you, thinking of your childhood, figuring out what things still have weight in your life, etc.) and go generic but Julie does some of the work behind the lesson, which is cool. I love the hair here and her background absolutely makes the image pop. It's interesting that we both had moments where we were nervous about adding things and then both ended up pleased with the final results. 

I love trying new things in the arts and crafts world, even though some I ought to stay far away from...like the needle felting I tried. Those needles are flippin' sharp! 

What materials have you tried recently?

Happy Friday!
Chark

Saturday, September 12, 2020

Good Morning, Angels—Journaling with Julie 9

If you ever watched Charlie's Angels in the 1970s or the movie reboots, you got to hear Charlie say "Good morning, Angels." I'm old school, so I hear this in John Forsythe's voice. Though I imagine if I watched the original series now, I'd probably not enjoy it. But in the 70s, we had to watch network tv so even Love Boat and Fantasy Island were good tv. Of course, I was a child then, so maybe it wasn't good tv even then. Who knows?

But I digress. Today I'm sharing the angel projects that my sister, Julie, and I created with Lesson 9 in the Create Your Life Book that we each have. Julie's working in her home in New Jersey and I'm working in mine in Ohio. Then we share the results. For this lesson, you create yourself as an angel. Luckily, this was super easy for me because of my angelic personality but much harder for my sister. HA! (You gotta get in those zingers where you can when you have an older sister.)


First comes the collage part and the coloring. I used Arteza metallic gouache to color, along with some Tombow markers.


Then I added details with black brush marker.


Finally, I used a gold gel pen, white paint and white uniball pen to add details. I also used a damp paper towel to remove some of the gelato so you can see the collaged paper underneath (like my dress).


Julie used painted paper that was purple and white for her collaged papers. And though you can’t see it, she put images of me and our older sister, Teresa, looking over her shoulder. How sweet is that?  Then she used glitter tissue paper for her clothes and scrapbook paper that was feathery-looking for the wings. She finger painted some white acrylic paint on the wings and clothes and added some gold acrylic paint.


Finally, she used a gold Sharpie to outline parts of it and she says she's much happier with this version than the original version. Since we don't get to see the first one, we'll have to take Julie's word for it :) 

I like how they both turned out and that we both went with purples. This was a fun project and it's even more fun to do with my seester. And, hey, who doesn't want to see themselves as an angel?

Happy Weekend!
Chark


Friday, August 7, 2020

Seek and Find—Journaling with Julie 8

In this eighth lesson from this fun art journaling book that my sister and I are working on, you are supposed to create a page with collage, paint and water-soluble crayon and then find a picture within those shapes.

I'm sharing Julie's project first, because she actually followed the lesson. Julie had a piece of parchment paper she had brayered paint onto (not a verb really, but it is now) and glued it onto watercolor paper. Within the shapes and colors of her collaged paper, she found a bird and parent. Julie says it's a cross between an owl and penguin...which is a pretty good description imo. She used acrylic paint and sharpie for the outlines and added grayish paint around the birds. She also added the word family.

I love how he turned out—so cute! And definitely great colors from the papers. Now, here's my project.


This is actually my second attempt...with the first attempt, I collaged papers and then added acrylic paints, but I ended up basically using way too much paint and it ended up just a painted background with some square shapes under it from the paper. You couldn't see the papers and there was no variation to the paint. Fail!

Tried again and used a page that already had some textured stenciling, added some more paints and then just drew in a face like the sample page. I didn't find anything in my painted piece that suggested a face or shape. I think I just had too heavy a hand with the paint. I did have fun with some finger painting and color blocking but this is not my finest interpretation of a lesson.

That's if for this one...the next lesson is to make yourself an angel and since I already am one (just ask my sister...wait, don't ask her), it should be a piece of cake. Lolol

Happy Friday!
Chark


Saturday, August 1, 2020

Flower Power—Journaling with Julie 7

Lesson 7 from the Create Your Life Book Art Journal (that my sister, Julie, and I are working on in our respective craft rooms in our respective states) is about meditating on how you're feeling and what words come to mind as you meditate.


You're supposed to write down some words that come to you in pencil on the page...you can write anything and I wrote down tons of stuff I am worried about. I scribbled, I overlapped, I just spit it all out on the page. Then you're supposed to go over it and cover it up. So I did. I collaged with some papers, some die cuts,  and just a bunch of stuff. 


Then I painted over all of them with watered down acrylics.


Next, I drew some loose shapes, just hearts and flowers and outlined them in black gelato.


I went over all of it with white acrylic paint and it toned everything down too much. So I spent some time adding paint and tombow markers to make it more colorful again and smudging and adding extra doodles. I also outlined everything again with a sharpie. 


I'm happy with the final result, but it was a long time before I was. That yellow washi is from a defunct etsy shop, but I snagged probably five rolls in different colors and patterns. It just makes me happy.


Julie decide to use inspirational words on the first layer with colored pencil...faith, compassion, family. Then she added some papers, including scrapbook papers, vintage papers and some she had already painted and printed. Julie also used acrylic paints, using her fingers and then added white with a brayer to pull it all together.


She used white paste to stencil and added swirls for texture. Then she added a sharpie around the circles, which reminded her of flowers, so she used a Pitt brush pen to add branches and white gel pen for texture. I definitely like the contrast the marker gives and I didn't even push her to do it :) I also like how the contrast makes the flowers stand out and how she let the piece speak to her, as I really just drew flowers for no reason but she used the shapes to suggest what to make. 

This one was fun, I'm enjoying all the paper tearing and painting, but I think I need to let those papers show through a little more.

Happy Weekend!
Chark


Saturday, June 6, 2020

It's A Bird! Journaling with Julie 5

So, my sister and I are each completing the art journal prompts from this fab book by Tamara LaPorte—it's on sale here at Dick Blick I noticed. Julie and I live a couple states apart, but we try to work on the same lesson at the same time and then share our results. This week's lesson was a Quirky Bird and it was super fun and easy.


We used watercolors and doodles to make them. It's supposed to be a representation of you, so my bird is holding a pen and book and Julie's has glasses. Here's my bird in the early stages of watercoloring.


And here's the finished version after markers and doodles and lettering. The quote on the book is something my husband's Aunt Mae said about me once. I took it as a compliment.


This is my sister's version. I really like the black background and the intricate symbol she drew. 


Are you doing any collaborative art projects during this crazy time? I'm joining in some challenges to try to keep my art going so I don't get discouraged with life right now. Art heals and I'm determined to keep a positive outlook and hope for a better world.

Happy Weekend!
Chark


Friday, April 24, 2020

A Pocketful of Hearts—Journaling with Julie 3

My sister, Julie, and I have been art journaling together at a distance. We found out we have the same book with lessons and decided to do each lesson at the same time. Today's lesson was about creating a pocket of hearts.


The idea is to fill each heart with things you love with photos or names. I used washi, inks, stickers, stencils and gelatos to decorate mine and added phrases about what I'm grateful for and beliefs I have. I used a hole punch on them at the bottom and made a kind of fan of hearts. 


Then I created a pocket on a previously painted art journal page to store the hearts. I added stickers and a quote I had lettered to the front of the pocket.


I found this fun and fairly quick to put together...but I did break it up into a couple of days because I wasn't sure where I was headed. I added some gold washi around the page as a frame for the very last touch.

Julie planned to put names of loved ones on hearts but as she has four kids, three of whom are married with their own kids, she would've had to make something like 18 hearts just for them! I like what she ended up doing and making a heart for each family and adding initials to represent them.


These are the backs of the hearts.


These are the fronts, with collage and stickers and markers. 


And this is the final project, pocket and hearts. 

And guess what? Today, April 24th, is Julie's birthday! So Happy Birthday to my big sis, who's making my quarantine fun and something to look forward to! Here's a cute pic of her and her hubby.


Happy Friday!
Chark