Showing posts with label peony. Show all posts

Thursday, August 30, 2018

Pink Peony Card

Today I'm sharing a card using the Hero Arts Peony Clear Stamps that I'll be entering over at A Blog Named Hero for their August challenge here.


The stamp set has a large beautiful peony and some smaller buds and leaves. I also used the coordinating dies. Then I mounted it on black paper and trimmed that out by hand. For the shiny part, I used a holographic silver foil on a pre-printed and designed sheet made for foiling. I added some enamel dots, along with a hello die cut in black to finish off the card. Here's a close up of the shiny goodness. There are words in the foil like "beautiful" and "dream a little dream."


I mounted it on a light pink panel of Lawn Fawn watercolor paper and added a strip and black and white paper to the side. 

I love this floral stamp and plan to use it a lot in the future...peonies are so lovely, even if they are the world's favorite hangout for ants! I swear, I always found a million of those guys on my mom's white peony shrubs. Fun fact: I didn't know they were really called peonies until adulthood because my mom pronounced it like her mom (originally from Hungary) and said, "piney."

You can join me for the Sparkle and Shine Challenge at A Blog Named Hero—I can't believe I didn't glitter anything for this challenge!


Happy Thursday!
Chark

Monday, October 10, 2016

Woodburning Made Easy

I'm in no way good at woodburning, but I felt like it was a cool thing and wanted to try it. I got the Hotmarks tool since I saw someone use it in making shaker pockets too for cards. 

Turns out, it is super cool to do and the effects are unique, so I keep trying things. Here's a wood plaque I made for a teacher with my favorite Altenew Peony Bouquet stamp.

All you need to do is stamp in brown (I used Distress Ink in Vintage Photo) and then use that as your template. 


Here's what I learned about woodburning in the process; one, even if you mess up, it still looks pretty cool, two, sand the wood piece a little in case it has an oil or shine to it, and three, use a glass cutting board to set the stand on and tape the stand down. I never had any problems, but that was my way of circumventing problems—mostly because my firefighter husband asked, "You're not going burn the place down, are you?" I didn't, and I waited til he was out to give it a shot. Less stress for both of us, ha!

Happy Monday!
Chark

Wednesday, October 5, 2016

Peony Bouquet in Black and White

I love the Altenew Peony Bouquet color layering stamp set I got and I knew I'd be featuring it all week...here's Day Two with a bookmark I created using just black ink and masking. I got the idea from the packaging from Skullcandy earbuds my son got.

Here's the package. It's actually silver on white, but I went with black and white.


I'm not a huge fan of masking, but it was necessary for me to achieve this overlapping look and I enjoyed how it turned out, so I guess masking won't kill me :) Yes, it's a little extra work, but it's worth it.


And here's a closer look. 


Ever tried just stamping black and white with no intent to color? It was a different idea for me, the coloring is usually the fun part, but when inspiration strikes, you gotta go with it!

Happy Wednesday!
Chark


Monday, September 12, 2016

Altenew Peony Project

I love my Altenew Peony stamp and use it way more than I should—I think my other stamps are jealous! I tried using it with different media like watercolors, markers and colored pencil and now I'm trying it on different media. Here it is on wood. 


This is a little wood tag from a Mason jar set of different sized wood tags, presumably to decorate your Mason jars, but I thought they were the perfect size for keychains and maybe even a bracelet, if you use the smaller piece. So, here it is in keychain form.

I started with Copics, knowing they would bleed a bit, and they did. I didn't color too closely to the stamped image for just that reason. And then I worried I'd hurt my nib, so I switched to Distress Inks and a dauber.

After I got the color where I wanted it, I used colored pencils to sharpen the dark and light areas. You can see the white pencil in the close-up.


And it took me all of 20 minutes to get this look. These would be lovely and fast little gifts, once you attach the keychain fob.

Do you ever stamp on anything other than paper? It's fun!

Happy Monday!
Chark


Friday, August 12, 2016

Books 'N Cards

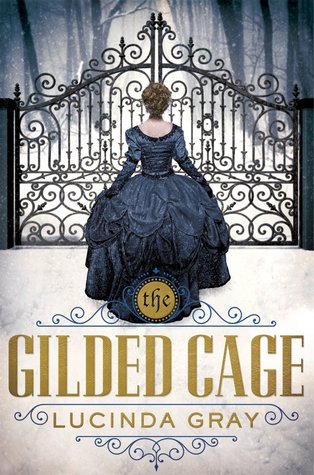
I love historical fiction...and I love Young Adult fiction (even though I'm way past Young Adult age, ha!) and this cover definitely makes me want to read this book. 

Here's the synopsis. After growing up on a farm in Virginia, Walthingham Hall in England seems like another world to sixteen-year-old Katherine Randolph. Her new life, filled with the splendor of upper-class England in the 1820s, is shattered when her brother mysteriously drowns. Katherine is expected to observe the mourning customs and get on with her life, but she can't accept that her brother's death was an accident. 


And there's more—strange visitors, a bitter poacher and wild animals...okay, now I definitely want to read it!

Here's a card loosely based on the cover. The scroll work of the fence and the title reminded me of an intricate die from Spellbinders that I have.


My blues are brighter than the gray blues here, and I used silver toned paper instead of gold...but with the title, gold should've been the watchword! Maybe I'll try it again. If I do, I'll post that version too! Too bad I don't have any tree stamps like the trunks on the book. Hmmm...now I have to go see if I have anything similar. This is the Altenew Peony stamp that I've been using over and over lately :)

Hope you have some reading or crafting time in your weekend, I'm off to an art journal class this morning!

Happy Friday!
Chark

Friday, August 5, 2016

New Markers, New Markers!

Yes, I'm excited, cuz I finally got some new Zig Clean Color Watercolor Markers. I got the Assorted set with black and 5 other colors and they are gorgeous!


I tried a technique I saw online where you stamp with a solid stamp and then add in details with the markers, but it didn't work as well as it did for the lady on the video. 

So I used the outline stamp and that worked so much better. I needed the extra outline to know where to put my shadows/darker colors. I loved these markers with my Peony stamp from Altenew.


If you look closely, you'll see the one on the left is without the outline and the one on the right is with the outline stamped in the same marker. The one on the right is my fave. Great colors with these watercolor markers!


Have you used these markers? So far, they seem like a good investment, though I won't be buying the huge set. I think these 6 will do me fine.

Happy Friday!
Chark

Friday, July 29, 2016

Floral Layering

I have a couple more floral color layering stamp projects to show you. For both of these, I used the Blue Unicorn Ink (on sale right now for $4 at a2z!) from Hero Arts as the first layer and then Navy Mid-tone as the second and Distress Ink in Broken China as the third layer.

I added an olive green to the background for the first one. 


For this one, I used a true green and spring green for the background. 


I've seen this Peony stamp from Altenew in a lot of different cards and I love it. You can even just stamp the outline, which is nice for coloring in with markers or pencils. Stay tuned for Monday, I might just have an example of that!

Happy Friday!
Chark

Wednesday, July 27, 2016

Altenew Peony in Blue

Okay, so I looove the look of layered flowers in stamping right now and Altenew has some of the best imo. So I got this Peony set and am so happy I did. I spent a lot of time fooling around with it and although I wasn't sure how to do the leaves, I loved how easy the blossoms came together. 

I ended up watercoloring some leaf backgrounds and using the leaf stamps on some and drawing in some leaves on some. Here are two of my tries. 

These aren't cards yet, but they will be, since I like how they turned out. This one uses Navy Mid-tone ink from Hero Arts as the first layer...then I added the Unicorn ink in Blue. The greens are Tombow Markers in olive and dark green and I stamped the leaves in black.


For this one, I used the Blue Unicorn Ink for the first layer and then Distress Ink in Broken China. The light ink kind of muted the Broken China, but I liked the effect. I used the Hero Arts Neon Chartreuse to Blue for the leaves.


My goofy daughter (who's 21) came in after I'd stamped these and said, "What kind of stamping voodoo is this?" Apparently she's not seen the layered stamping yet, but it made an impression :) and she liked the look of it. Me too! Do you use layered stamps? I've found these flowers to be pretty easy to use.

Happy Wednesday!
Chark